After having discussed Unity3D’s GUI class and the GUISpriteUI system as two different methods of creating 2D games in Unity3D, we’re now ready to discuss a third method: combining 3D graphics with orthographic projection.
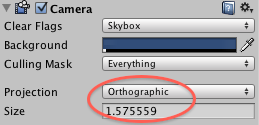
For this to work, you’ll have to create a scene in 3D, and then set up the camera to use orthographic projection instead of perspective projection.
If all you want is to use 2D textures, you can simply create cubes and assign them materials with these textures.
The fact you’re using a 3D engine to create your 2D graphics actually allows you to do more than that; the possibilities include using the physics engine, or use 3D animation blending for your characters.
To set up your camera correctly, you have to set Projection to Orthographic, and you have to set the Orthographic Size.
Especially in prototypes where the physics engine needs to be used, this can come in very handy. The following video gives you a peek behind the scenes of the Gremlin and Bayou Bird prototypes:
The fifth and last post in this series about achieving 2D in Unity3D will summarize the advantages and disadvantages of the different methods, so you’ll know which method to choose depending on your needs.

